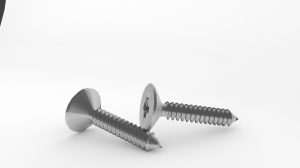
This fast speed modeling video tutorial will show you how to model a screw in Blender 2.6.
Creating a screw in Blender 3D 2.6 from FasterTutorials on Vimeo.
Written instructions:
Hi!
In this tutorial we are going to create a screw.
First enter edit mode and add a plane next to the default cube. We’ll use this mesh to control our screw profile.
Delete the bottom corner vertex and rotate the rest of the mesh minus 45 degrees. Shape it the way you want your profile to look. We’ll extrude the top vertex upwards to create more spacing between the rails.
When happy with the profile controller go to the mesh tools panel and hit the screw button.
You can control the vertical stacking amount with the turns parameter.
The steps setting controls how many faces are used to form each round. We’ll set it to twenty.
We don’t need these cubes anymore so let’s delete them.
For the stem we’ll add a cone mesh. Use the same number for the amount of vertices as you used for the screw steps, which in our case is twenty.
Rotate the cone, add an edge loop and delete the tip. Then scale it so that it matches the rest of the screw.
Create a bridge between the cone and the rest of the screw by selecting two opposite edges and pressing f.
Let’s extrude the stem upwards a bit.
Then add a new cone which will become the tip of our screw. Rotate, scale and move it to match the bottom of the screw.
This time we’ll speed up the bridging process with an addon called loop tools. With the addon activated, we’ll pres w and select bridge.
When finished with the tip it’s a good idea to remove doubles and recalculate the normals.
Let’s shape the bottom part of the screw rail a bit.
Now it’s a good time to work on the stem. Let’s fill it with quads by selecting two opposite edges and pressing f.
Loop cut the resulting face so that you can create more faces from the sides.
Straighten the vertical edges by selecting a straight line and scaling it on the x axis to zero. Straighten the horisontal edges by selecting a straight line and scaling it to zero on the y axis.
Then selected the faces in the center. These will become the hole for the screwdriver tip.
Extrude down on the z-axis.
Extrude again and scale down a little bit.
Modify the hole to your liking.
Let’s fix the uneven shading on the stem with some tightening loop cuts.
Now we’ll switch to cycles and give our screw a material. Use a mix shader with one part diffuse and the other part glossy.
Let’s also add a cube and create a backdrop from it.
Duplicate the screw if you like and tweak your render settings.
Now we are ready to do our render.
Thanks for watching and see you next time on fastertutorials.com.

No responses yet